Training an Object Detection model in RunwayML to Analyze Posters

In this tutorial, we’ll train a custom version of YOLOv4 — a popular object detection model known for fast and accurate results — to detect regions of interest within posters.
Before we begin, you will need to update to RunwayML 0.13.0+ to access object detection training.
Let’s get started!
Step 1: Getting started
To get started, open Runway and go to the “Training” tab.
In this view, we can see the different types of models available to train on RunwayML.
Click on “Train an Object Detection Model”. Choose a new name for your training experiment and click “Create”.

Step 2: Choose a dataset
After creating our training experiment, we will be taken to the “Dataset” view for your experiment. This is where we can upload images containing objects we would like our model to detect.
Alternatively, we can use one of the publicly available datasets.
Once you’ve selected a dataset, click “Next” to continue.

Step 3: Annotate
For our model to learn which objects to detect, we have to give it examples from within our dataset. We do this in the “Annotation” step by identifying objects in our dataset and drawing boxes around them.
To get started annotating, create a “New Annotation Group”. An “annotation group” is a record of all the annotations associated with images in a dataset.

Once you create your annotation group, you will be directed to an editor where you can annotate objects in your images.
For new annotation groups, you will be prompted to create some initial categories. This is where you define the categories of objects you would like your model to learn to detect.
Let’s go ahead and add a few initial categories. For our poster analysis model, it would be great for it to be able to break down posters into graphics and textual elements, as well as indicate some sort of visual hierarchy:
- Primary: Elements which are the point of focus in the poster
- Secondary: Significant elements in the poster but not the most dominant
- Tertiary: The finer details in the poster
- Text — Primary: Title text
- Text — Secondary: Smaller subtext
Now that we have categories, we can “Start Annotating”. Don’t worry too much about getting them right at this point. You can rename, add, or delete categories at a later stage.


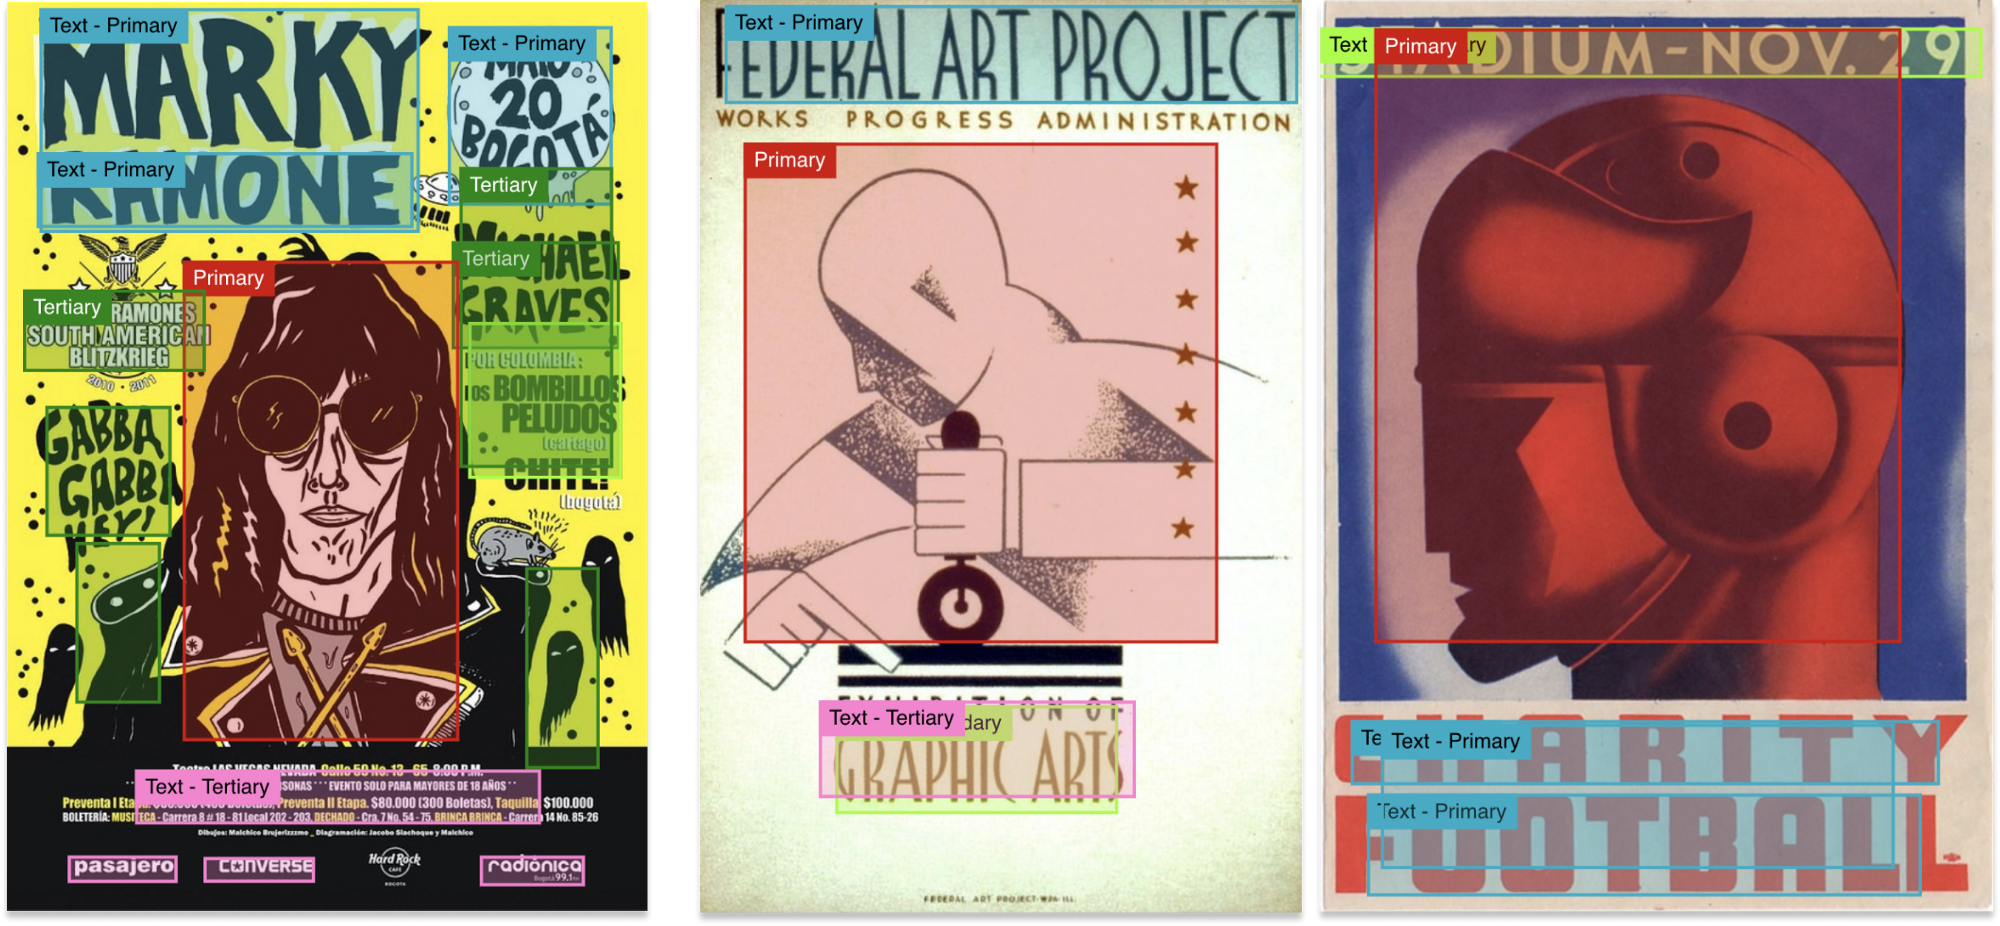
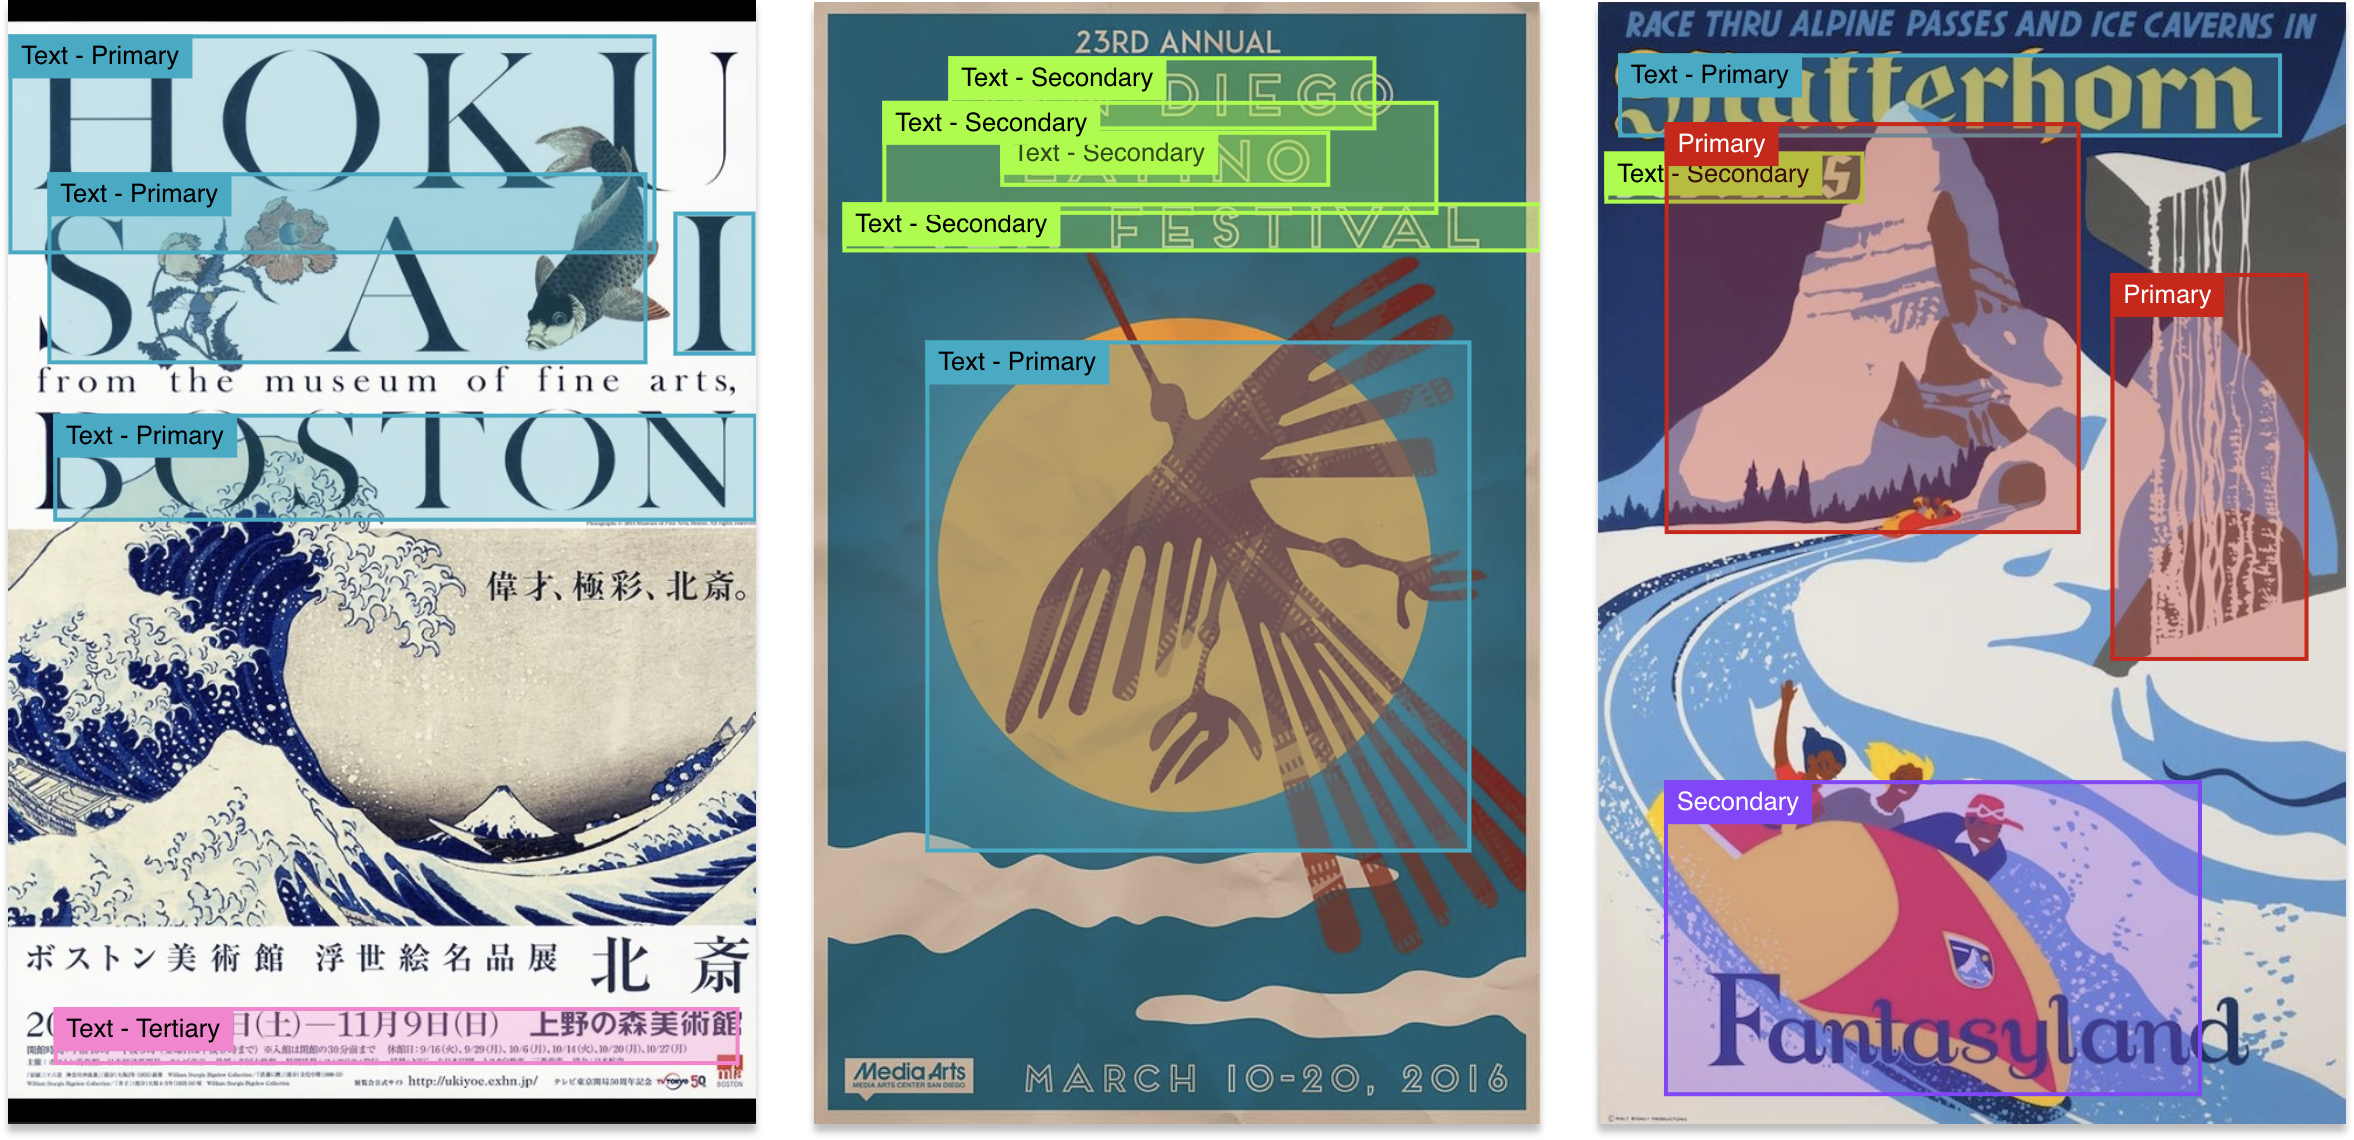
In this view, we see an image from our dataset on the right along with a sidebar on the left which displays useful information such as:
- the number of files we have annotated
- the categories we have defined
- the annotations on the image
To annotate your image, simply select the category you want to annotate from the sidebar and click-and-drag over the object in your image. When you have finished annotating your image, click “Submit”, or press the Spacebar to submit your file.
Annotating can be quite time-consuming, so we’ve added a few keyboard shortcuts to help you streamline your process. These hotkeys help you switch quickly between categories, submit annotations, and more. For more information about hotkeys, hover over the info icon on the bottom left of the editor.

As a general rule, the more annotations you submit the better your model’s results. To ensure that you have enough annotations for your model to perform well, there are a few conditions to be met before you can start training:
- Sufficient Submitted Files: There are enough files submitted
- Sufficient Total Annotations: There are enough total annotations across the whole annotation group
- Sufficient Category Annotations: There are enough annotations for each example
Don’t worry about having to remember this — we’ve simplified it into a single icon in the sidebar to let you know if your annotations are ready for training.
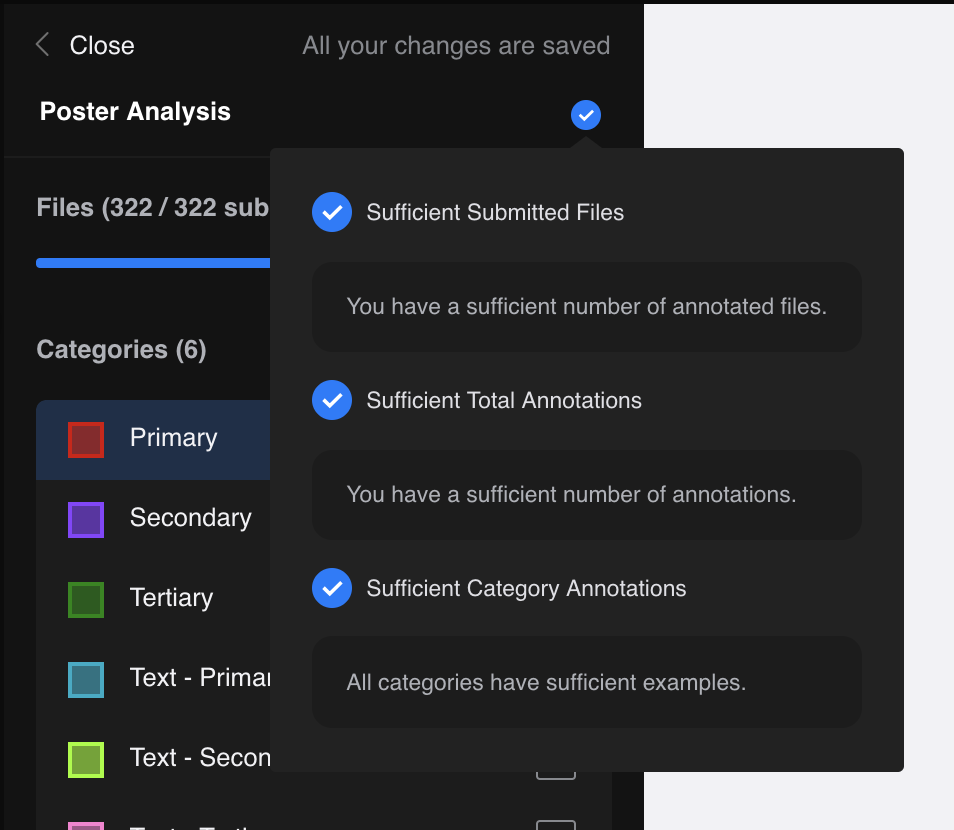
When the indicator shows you a blue tick, and you are happy with your annotations, feel free to “Close” the editor.
Click “Next” to continue setting up your model.
Step 3: Setup
In the “Setup” view, you can set up the training options for your model. These include selecting a pre-trained model as a base to start training from, as well as setting the number of steps to train for.
Let’s use the default pre-trained model and number of training steps for this tutorial.
Click “Start Training” to start training!

Step 4: Train
Sit back and watch as your model improves with each training step. In this view you can get an idea of how your model is performing — visually, by seeing example predictions improve over time or through the “mAP” (mean average precision) score, a measure of the model’s accuracy.
At the start, you may see an overwhelming amount of detections — don’t worry! This is expected and you should gradually get better results as your model improves with each training step.


Step 5: Play
Now that we have a trained object detection model let’s go ahead and use it!
RunwayML allows you to interact with models in a variety of ways — in a workspace for real-time testing, to run a task, or as a hosted model to use in your applications.
To quickly see what our model has learned, let’s add it to a workspace. We can do this easily by clicking “Add to Workspace” in the “Review” tab of your experiment.

You will be directed to a workspace containing your model, ready for you to test. Click on “Run Remotely” to start the model. Selecting your input images by clicking on one of the input options above. I’ve selected “File”, which allows me to select a folder of images from my computer.
Your model will predict bounding boxes once it is running, and you have selected an input image.

From the results, it looks like the model has learnt to generalize from the annotations we gave it, and can detect primary elements and text quite successfully from these posters. Try it yourself here.
There you have it — training a custom object detection model in RunwayML. What now? We could improve this model further by feeding it more annotations and training it for more training steps. Or try experimenting with your datasets for creative projects: identify different types of birds, pasta shapes, cartoon characters, and so on.
For more detailed information on training object detection models, check out our docs.
If you are new to Runway, check out our other tutorials for more models you can train — image and text generation — as well as other models you can experiment and play around with!
Resources